Showing posts with label Pinterest Pins I've Actually Done. Show all posts

Wednesday, January 13, 2016

My Pinterest Playroom: How To Decorate On A Low-To-No Budget

Let me first state that I am a Pinterest-a-holic. I am constantly looking on there for ideas about kids activities, healthy recipes, renovation ideas, ideas for my home business, and so on. I love looking for inspiration on how to use what you already have in new ways, that are organizational, decorative, and cost-effective.

Organizing a playroom and keeping it organized can be exhausting in itself, let alone trying to make it more 'fun'. I've been putting off posting about the playroom transformation, in hopes that it would be fully complete. I've now come come to the understanding that the development of it will probably always be in flux, haha.

The room was really basic when we first moved into our house. We knocked down a wall (that was really only a temporary wall set up by a previous owner...we're still not sure why haha). This gave a sightline to the playroom from both our bedroom and the kitchen. We lived with it the way that it was for quite some time, and then I made the realization that this room was boring....really, really, boring!  We needed a space for the girls that they could store their toys in, play in, and would help stimulate their creativity. It also needed to be a place where I could watch them while recovering from surgery, or if I was having a not-so-great-feeling day.

We didn't have a budget AT ALL for renovating or updating a room. We had orange curtains (I have a thing for orange), taupe-y/putty coloured walls, and a rug we had put down on the floor (beige, brown, blue, and tan colours). We also had leftover paint from other areas - some white eggshell finish, and a few pre tinted recycled paint colours (which are only $19/can).

This is our room before we moved in.


This is our room now. It's definitely not boring, and the girls love it!


I painted the herringbone pattern on the wall after I found the idea on Pinterest here:  


We used white, a blue tint we already had (to tie in the rug) and some orange craft paint I had to tie in the curtains. Really easy to do and visually interesting (Luella loves the wall!). We sold the ripped leather couch we had for a smaller sofa-bed we found on Kijiji, so we had an actual bed for guests to sleep in.


I also added a pennant banner on the wall made from scrapbook paper that repeated the same colours in the room ($10 for the scrapbook paper, with lots left over for crafts). I got the template for the banner here:

We already had the jute string to lace them together.


^^this sign is as much of a reminder for me as it is for the girls...especially if I haven't had my coffee haha!!

 
^^^My office/craft area is to the left of the tv, as well as the hallway to the front door. On the right is our bedroom and the hallway to the kitchen.


After figuring out the feature wall and the colour scheme, I then wanted to have some 'stations' in the room that were geared towards different things. We made a book corner after being inspired from these Pins:

Picture-ledge book shelves -

'Mountain' wall painting -

And I also painted a dress-up area on the wall similar to this pin:


The bookshelves were made from recycled wood we already had, plus $6 trim from the building supply store. We used paint we already had, and I used a stencil and craft paint for the Dr. Seuss quote. The wooden curtain rod for the dress-up area was one that was at the house when we moved in. I used a chop saw to shorten it, and then primed it and painted it white. I hand-made a shape stencil for the wall, and printed off lettering and used transfer paper to sketch it on the wall, and then painted the letters and 'snowflakes/sparkles'. A removable hook for jewelry, a mirror I hadn't found a place for yet, and the girls dress up box they already owned completed the area.

I knew I also wanted a chalkboard area and a magnetic board. I found ideas for these here (and also in previously posted links)


I already owned the chalkboard paint for the signs I make, so we used that on the wall. (Although, after living with it for a while, we are going to make the chalkboard section go right up to the shelf, and right down to the baseboards). We also paid $25 for the sheet metal. Both of these areas still need to be trimmed out with white trim.  We sold the smaller used play kitchen the girls had, and found this larger one on Kijiji. Both girls are able to play with this at the same time, and they love love love they washer/dryer! There was no cost difference between the two kitchens :)

I'm really big on organization, but I also wanted the girls to learn where to put things away themselves. Everything needs to have a place to go to at the end of the day. We have a tall storage bin (which we had in the basement) which holds play food, colouring books and crayons, water paint and lacing toys. I not only labelled with words, but also with pictures, to help the girls learn and understand. I also have four bins that I keep off the floor and have on a cabinet in the hallway that I allow the girls to play with one at a time - blocks, musical instruments, Little People sets, and sorting/stacking and other learning toys. They have to clean up the bin they are playing with if they want the toys in another bin. This was to save MY sanity, as I was getting exhausted from cleaning up tiny toys all the time. We used a bookshelf and dollar store fabric cube shelves to hold all the other toys. (Note - each girl has their own stuffies and books in their rooms, but no noisy toys)

I found some great organization pins here:


We store the train set in two plastic bins under the train table (which doubles as a great playing table). We had found the table (which can turn into an easle) and the wooden train set and art accessories on Kijiji for $50. This was the girls big Christmas present :)

I used every inch of this area, including the hallway. 


I make the art clip signs and growth rulers for my home business, so it was just the cost of my supplies to make it for the girls. The craft cabinet was a gross, super-ugly cabinet that was left in our bathroom when we moved in. After some cleaning and $5 polka-dot Contact Paper, it looks great! This cabinet holds their paint and craft supplies, as well as their puzzles. (I lock it, haha). There is a hook on the side for their art smocks, and their car mat is stored in the corner.

We also needed some of the space for a make-shift broom/linen closet. We hardly have any storage in our house, so we have to get creative. We had 0 money for a closet organizer or shelves. But what I did have was lots of drawers. I had removed the drawer-front for my signs, but hadn't figured out what to do with the boxes. I had an "Aha" moment earlier this week, prepped and cleaned e drawers, and screwed them right into the wall for a "floating" cabinet look. 


We store towels, brooms, our vacuum, bedding, and floor cleaning supplies in this area. There is also a place for two little brooms so the girls can help clean - $1.50 from the dollar store :) I also put hangers on the back of 5 of them, and used them as cubby shelves at the top of the feature wall in the playroom to display Jaelyn's Preschool artwork and a few toys. No paint was needed, as they are beautiful all on their own! 


So, there it is! There is still work to do, like patching some holes in the wall, finishing painting the walls and chalkboard, trim on the doorframes and both the magnet and chalkboard...but it is getting there. All it took was some inspiration, just a little bit of money, and lots of effort.

I encourage you the next time you are looking through Pinterest to keep your mind open to what could be done with what you already have on hand. I don't aim for perfection, because that is overwhelming and expensive. Decorating doesn't have to be either.

Monday, November 30, 2015

A Season Of Hope

It's been just over 5 weeks since my surgery, and I am amazed at how great I feel. My front and back incisions are healed, with only the minor annoyance of itching (a sign of further healing and nerves working), I have completed my second, and last, fill appointment in my expander (which will be replaced by an implant during the next surgery), and I only have one more appointment scheduled during the next month with the plastic surgeon to finalize details. I am back to lifting and hugging my kids. I actually stopped taking pain medication of any kind only a couple weeks after, and other than sometimes waking up a little stiff and sore, things are pretty much normal.  I still have to limit how much I can carry for longer distances, and my range-of-motion in my shoulder isn't completely back, but it is almost there.

I also think I am the most prepared that I have ever been for the Christmas Season. Many of the presents I need to get have already been ordered or purchased...or I at least know what I am getting. My house is all decorated, except for finishing the tree with the kids this week. I even have our Christmas cards ordered, printed, and done, and ready for some to be labelled and mailed out in the next couple of days. How did I get everything done with everything I was dealing with? I planned ahead...I knew I would need to eliminate some things in order to relieve stress and heal. I put my sign-making business on hold during the busiest time of the year. I said "no" to all craft sales this season, and while I will miss the extra income, it was the right decision. Our family needed to get back to some kind of 'normal', and I wanted to be able to spend quality time with my kids, which meant focusing on recovery over the past month. I'm still making a few signs here and there, but I am determined to allow this next month to be fun and memorable for all of my family.


The season of Advent - one of my favourite times of the year - is a time of preparation, of anticipation, and of hope. It's not about being stressed about perfect decorations, presents, and going into financial debt. It's about celebrating the Advent of Christ - waiting in anticipation to celebrate that He came to earth for us. 

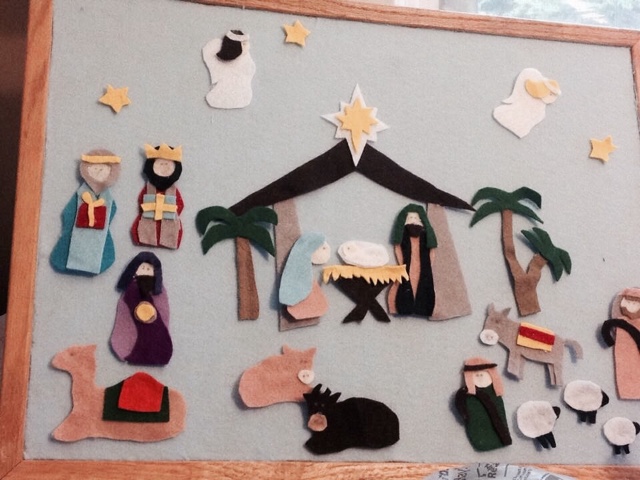
One of my huge pet peeves about Christmas  commercialism and  marketing is that it's almost impossible to get an Advent calendar that is actually celebrating the Advent of the Messiah. You want a play-doh, Spiderman or Elsa Advent calendar? Those are all readily available at every store. Don't get me wrong, those are all good fun and I like chocolate as much as the next person, but I really wanted to be able to teach my kids about Advent in a way that their almost 2 and 4 year old minds could understand. So, after scouring Pinterest, I decided to make a nativity scene where we could add one piece each day during the days of December leading up to Christmas (next year, I will probably adapt it to take place right at the very beginning of Advent, which started yesterday). I don't sew...at all...so it needed to be something I could just cut and glue together. I found a great pattern here: http://cutesycrafts.com/2010/12/nativity-advent.html , and just skipped the stitching around the edges of the pieces of felt. I also used some sticky velcro pieces on the back of each item so it can stay on the felt board more easily. For the felt board, I found a used bulletin board at the Habitat Restore for $2, and I used spray adhesive to cover it in felt (I tried flannel at first, but felt sticks much better).

I then wanted to find some Advent readings/lessons for little kids, so we could read a story each day, put the piece on the flannel board, and pray a short prayer. It starts with an empty stable and it ends with baby Jesus...and I want the anticipation and excitement to build as they add each new piece. It took me a while, but I found someone who had written readings for very young kids and had them available on their blog. You can find it here: https://partofthemain.wordpress.com/advent-readings-2011/ I had to adapt it some for the pieces I had already made, and also because my kids are very young, but I think it will work great. It also would work well if you already have an existing nativity toy set. I did have to combine some of my felt pieces I had made, and make an extra one of a dove (not pictured - but I just copied a simple clip art shape) to add to it to make it work, but I am really happy with the finished product, and the fact that it only cost me $12 to make. Plus, I have enough felt to make 'felt stories' for the girls to put in their stocking (search it on Pinterest...they really are a lot of fun!) Avon has a great Advent stocking garland that I purchased to put each story in (each little stocking is numbered 1-24), mostly because I didn't really have time or energy to make my own calendar. You can find my Advent readings here:  https://drive.google.com/file/d/0B6zds0ybrc1vUlc5ZXdQZVJDdnc/view?usp=sharing

I am really looking forward to beginning the calendar tomorrow with the girls. I know there will be days where I am tired, or exhausted, and may not want to put energy in to focus on these kind of details, but it is important. It's important for me to find my own time to reflect in God's Word myself, too...teaching my kids by example.

Christmas always seems to take so much preparation, and then the celebrating seems to go by so fast. I know all too well that when you are faced with life-altering circumstances, what once seemed important to you pales in comparison to what really is. I have a lot of things I am anticipating in the next year - another surgery just a few months away, possible revision procedures, and the hope that the worst is behind me. Some of my dear friends are facing greater obstacles. Some of you are so stressed out this time of year, trying to keep up with everything, that you feel like you are drowning.

This year, I encourage you to slow down, prepare your hearts, anticipate with hope the coming of the Christ Child. Celebrate that He came, and anticipate with hope that He is coming again. As the Christmas carol 'Joy To The World' says - "Let every heart prepare Him room".

"I wait for the Lord, my whole being waits,
    and in his word I put my hope.
6 I wait for the Lord
    more than watchmen wait for the morning,
    more than watchmen wait for the morning."
          Psalm 130:5-6

O Come, O Come, Emmanuel!

Friday, August 7, 2015

DIY Silver Cleaner and Glass Cleaner (Pinterest Pins I've Actually Done)

I've been really interested lately in making my own household cleaners...partially because of the cost, and partially because I'd like to use less chemicals in the house. Here are the latest I have tried:

DIY SILVER POLISH:


  I had 'acquired' some of my parent's wedding silver when I found them at my sister's house getting ready for a yard sale years and years ago. (Meaning I took them lol) I can't blame her much for getting rid of them...I hadn't really used or displayed them until now, but I am a sucker for pieces of history in my family, and I couldn't part with them.

I finally found a perfect use for them and a beautiful way to display them - I needed trays for the top of two wire shelves in my bathroom so I could set things on them without falling over. The little feet on them helped to give them stability so I didn't need anything to attach them, but they were quite tarnished from years of neglect.

I followed the pin's instructions: lined my sink with aluminum foil, put the silver in, sprinkled 1 cup of baking soda on top and covered in boiling water (note: I did leave it in the sink for a 1/2 hour, as the tarnish was bad). After the 1/2 hour, I removed the pieces and rubbed with a soft cloth. What a difference! I will probably need to do it again to get all the tarnish off, but they came out beautifu...I even tried it on some other metal pieces I had in the bathroom which weren't silver but did have that green metal tarnish on them...they cleaned up nicely.


DIY GLASS CLEANER

I have just started using this, so I haven't seen it's full effects, but it seems to work great! I found the pin here: http://wholenewmom.com/whole-new-budget/homemade-glass-cleaner-glass-cleaner-recipe/

The ingredients are 1/4 cup of vinegar and rubbing alcohol, 2 cups of water, 1 tbsp of cornstarch and some essential oil for scent. I used peppermint because I love the scent, and it's the only essential oil I have. Peppermint makes everything smell fresh! The only problem I am finding is the 'lint' from the paper towel I am using to clean doesn't always come off. Anyone have a better alternative?


Sunday, April 7, 2013

Pinterest Pin Review - Mini Meatloaves and Sweet potato fries

My little girl is a carnivore....plain and simple. She likes her meat. So I figured that mini meatloaf would be one of her favs, and it was! I found the pin here: http://www.makeandtakes.com/mini-meatloaves-in-a-muffin-tin

It basically lets you use your own recipe, and gives you cooking instructions. I'm a pretty basic meatloaf cook, so here is what I used:

2 pounds of extra lean ground beef
1 pkg. of lipton onion soup mix
2 eggs
2-3 pieces of bread, made into bread crumbs
...and I squirted in a bunch of ketchup (I am not always a recipe follower!)

Spray your muffin tins with Pam, and put in mixture. After making it, I would suggest not having the meat come up past the top of the pan - probably about 1/2 inch below it would be perfect. The pin also suggested making a little hole, or crater, and putting something in it. I of course used a little dallop of ketchup :) then bake at 375 for 30 minutes.

I also made sweet potato fries, using this pin: http://www.wikihow.com/Roast-Sweet-Potatoes
Again, a simple recipe - I just used one sweet potato cut up, and some oil. I have made these twice now, and they turn out much better if you watch that you don't use too much oil, and if you cook them by themselves (without something else in the oven)...or they will be soggy! I have discovered that I LoVE sweet potato fries! My family...they don't like them so much. The mini meatloaves on the other hand were a hit.....carnivores.....


Saturday, March 23, 2013

Pinterest Pin Review - Chocolate Peanut Butter Mug Cake

My husband and I were wishing we had bought some cookies, or candy...or anything really to snack on. But, alas, we had nothing. I had read about make at home mug cakes on Pinterset, and thought I'd give one a go - you can find the pin here: http://eatdrinkcraft.blogspot.ca/2012/03/best-chocolate-mug-cake-no-serioulsy.html

It was a fairly simple recipe, and it looked like a too-small amount at first, but it is soooooo good!

Here is the recipe:
2 tablespoons flour
1/2 teaspoon of sugar (or to taste)
2 teaspoons unsweetened cocoa powder
1/4 teaspoon baking powder
Pinch salt
2 tablespoons milk
1 tablespoon oil
handful of mini chocolate chips (I used just regular ones)
1 Tbs peanut butter (or caramel, jam, nutella, almond butter, etc)

In a small mug combine the flour, sugar, cocoa powder, baking powder and salt until no lumps remain. Stir in the milk and oil until smooth. Make sure to scrape your fork around the edges of the cup so you don't get pockets of dry flour. Mix in the chocolate chips. Drop the peanut butter into the chocolate mix and push it down to submerge. Bake in the microwave on high for 1 minute. You may need to add or subtract 5-10 seconds depending on your microwave, but don’t be tempted to overcook or it will be dry. It should still be moist on the bottom and will continue cooking as it sets.

Give it a try, you'll love it!

Tuesday, January 1, 2013

The Blessings Jar

When I saw this idea going around Facebook and Pinterest this last week, I knew it was something I wanted my family to do...and what better day to begin than New Year's Day.  We now have our very own "Blessings Jar", where we will record our blessings throughout this coming year, and read them together as a family next New Year's Eve - giving thanks to God for all He has done.

Being budget conscious, I used a jar I already owned, and found a printable online by Googling "Blessings Jar" and selecting images.  I found a perfect "Count Your Blessings" printable, and I added the words "and Good Times Jar!", and taped it to the jar.  I cut up strips of scrapbook paper that I already owned that matched my decor, and placed it in a prominent place in our house.

I am excited to see how God will bless our little family this coming year, and I am excited about how this process will help us to be more thankful and content in whatever circumstance God leads us through.

Happy New Year!


1 Chronicles 16:34 (NLT)

34 Give thanks to the Lord, for he is good!
    His faithful love endures forever.


  • Our "Blessings Jar"

Friday, November 16, 2012

Pinterest Pin Reviews - Make Ahead Breakfast Sandwiches & Apple Cinnamon Water

It definitely has been a while since I have blogged on here.  At the beginning of this month, my maternity leave came to an end and I reentered the workforce (for me, that is Retail Sales).  It has been a learning curve juggling taking Jaelyn to and from childcare, making meals, and getting our housework done...but my husband and I have survived the first couple weeks :)

During these weeks, I had some opportunities to try out some Pinterest Pins I had wanted to try.  The first one being those "Make Ahead Breakfast Sandwiches" (link found here: http://www.homebeccanomics.com/2011/09/14/make-ahead-and-freeze-breakfast-sandwiches/ )

We made a dozen at first - not totally following the directions.  We toasted English muffins, added cheese slices, a one-egg omelette, and a small round piece of ham.  we then immediately put them in some paper towel and ziplock bags.  throughout the week, we would unwrap them, and put them in the microwave for two minutes before we headed out the door. The result?  They were tasty, but a little soggy.  I reread the instructions, and added some things for the next time we made them.

The next time around we added cooked sausage rounds instead of ham, and we waited for them to cool before wrapping them in paper towel, and placing them in ziplock bags to freeze...much better!  (And when you reheat them, leave the paper towel completely wrapped around them, that way it will absorb any moisture)  This last time we made them, we drizzled some pancake syrup on the English muffins before putting them together...very tasty!  We want to try different varieties so we don't get bored, but on mornings when Darren leaves at 6:30 (which is every weekday morning) and days when I have to leave at 7:15, these are a great way for us both to have a breakfast on the go that will fill us up until our next work break.  Highly recommend it!


Now, for the second Pinterest Pin (and the link can be found here: http://tonetiki.com/2012/04/01/apple-cinnamon-day-spa-water-0-calories/ )....who ever thought of putting apple slices, ice and cinnamon in water and letting it sit overnight for a great weight loss and energizing drink has obviously never tried it.  I asked my husband to try some that I made, but when he came out of the kitchen he had a glass of orange juice instead.  I said, "I thought you were going to try that water!".  And he replied with, "I did."  The result of that experiment?  No...just no....unless you like the taste of slowly browning apples floating in water.
Our breakfast sandwich creations...
The epic apple water fail....

Sunday, October 14, 2012

Prepping For A Busy Week

In an effort to help make my life more-stress free, and therefore more enjoyable, I am continuing to try out Pinterest Pins that I think will help me out.  This week:  pre-frozen breakfast sandwiches (my husband is starting his route this week with his new job at a courier company...which means early mornings...I am determined for him to have a good breakfast AND for him to not spend money eating  out!)

English muffins, cheese, egg omelette and ham, all ready and individually frozen!)


For myself, I know I need to drink more water every day, but to be honest...I HATE drinking water!  I ran across this Pin about apple cinnamon detox water and though that hey, it couldn't make water taste any worse, right?

thinly sliced apple, cinnamon sticks, ice and water...sitting in the fridge overnight 

These are now all ready and sitting in my fridge/freezer.  In the next couple days, I will be testing these ideas, and then post a review (I'll also share the websites/Pins where the ideas came from).  

In other news of house prepping, we are also trying to seal off drafts in my house (doors, windows, fireplace), as you can definitely tell the temperature is dropping out there.  It is October, and you won't hear any complaining from me (except maybe about the price of oil).  I actually don't mind cold weather.  

Friday, September 28, 2012

Breakfast Casserole In The Slow Cooker Review

When I found this recipe on Pinterest, I was really excited to give it a try... I mean, who doesn't like breakfast?  The original website that the Pinterest pin linked to is this: http://www.alattewithotta.com/2010/11/crock-pott-recipe-egg-brunch-casserole.html 

Basically you later frozen hashbrowns, cooked bacon, sautéed onions and garlic, and cheddar cheese. You then pour a mixture of eggs with whole milk and salt and pepper and some other spices on top.  I personally do not like the spice, dill, so I didn't add any of that.  We aren't huge pepper fans in the morning either (I know, I know...we're boring), so we decided not to put that ingredient in.  We also didn't have any whole milk in the house, so I just used 1% milk and added a little dash of cream.  The main flaw with the recipe is that it claims that you needed to cook it 8 to 10 hours on low in your slow cooker… It was finished in under five.

In the end though, it was pretty good, but I would recommend cooking it for a brunch, lunch or supper.  Setting it before you go to bed to cook for five hours and then warm for a bunch of hours, runs a serious risk of burning, which is what would have happened if I had cooked it for the recommended amount of time.

We added putting a little drizzle of maple syrup or storebrand syrup on top... Made it taste like skillet!


Wednesday, September 26, 2012

Thursday, September 20, 2012

Heeeeey......Macaroni!

I've seen a lot of 'sensory bag' and 'sensory bin' pins for babies and toddlers on Pinterest lately, and I've pinned a few myself.  I have every intention of making these - lots of them.  Unfortunately, many of my crafting supplies are still in boxes in our basement (which, if you've never been to Sydney, NS, you may not know that the stairs going down to many older basements are pretty much ladder-like in their steepness).  As long as I'm alone with the baby during the day, I won't be going down there anytime soon.   I've also read a lot of reviews from pinners on these sensory bags, about how the bags will frequently rip or leak, and make big messes.  I'm not a fan of big messes.

I decided that I was going to make Jaelyn's first sensory bag, and that it was going to be simple.  What to put in it?  Macaroni.  That's it.  No liquid, no color, just macaroni.  I found a large freezer bag, put in some, made sure I didn't trap a lot of air in it, and sealed it.  I also went over the opening with packing tape, as I didn't want the pasta to 'escape' and go everywhere...and raw macaroni is not the best play toy for an infant when it is not encapsulated in a freezer bag.

It took about a week for my little sweet Jaelyn to get up the courage to actually touch the macaroni sensory bag...she's shy around things she isn't familiar with sometimes.  She finally is grabbing it, shaking it, squishing it, and throwing it.  She's not sure about it...it feels weird...and that's the point.


Wednesday, September 19, 2012

Baby Safe Wipes Box

Who hasn't heard about that dreaded moment when a mother finds that her child has taken every single wipe out of the box and thrown them around the room?  Not only has it made a mess, but depending on how long the wipes have been out and the manner in which they were thrown, they may be unusable.  I recently found a Pinterest idea that was pinned by "A Spotted Pony" (http://aspottedpony.com/fun-for-kids/turn-a-wipe-container-into-the-best-infant-and-toddler-toy/876/)  You take an empty wipes box, and fill it with squares of fabric.  Problem solved.

I decided that this was a pin I would like to attempt, but I realized I don't own a sewing machine and since I didn't sew, I didn't own pieces of fabric.  I did, however, have a bag of baby clothes that I was going to donate to Value Village (mostly items that I couldn't sell, or give to people that I knew personally that needed them, and I wasn't keeping for the next child).  I grabbed some scissors and cut them up into sqaure-ish shapes (hey, I'm not a perfectionist).  I also received free Disney stickers in the mail, so I put them on the box...and voila!  A new sensory toy, and it cost me $0 to accomplish!

Jaelyn is mostly intrigued with the pop-up lid right now, but each time she plays with it, she understands more and more that there are things inside that she can pull out.  ThIs is a great learning toy that any Mom or Dad can make!


Thursday, August 30, 2012

Budget Friendly Activities For Baby - "Treasure Baskets"

I was scrolling through Pinterest this morning (as I usually do), and I came across a Pin that described having sensory activities for your baby.  I love the idea of having learning activities for my daughter, but frankly I don't have the money or time to set them up....so I thought.  When I clicked on the link to the site, my mind was blown by all the activities I could have for my daughter and her developing brain, all for free!  Before I go any further, I want to acknowledge the site: http://www.theimaginationtree.com/2010/10/heuristic-play-treasure-baskets.html and encourage all mothers (and moms to be) to check it out.

After flipping through different pages on the site, I came across an idea for a baby 'Treasure Box'.  Basically, you find things around the house and put it in a basket.  You then give it to baby and let her discover things for herself.  Now, usually Jaelyn will play with a toy that I give her, and when she's done she'll throw it, or become distracted by something else.  I was a bit skeptical that this idea would work, but I went ahead and decided to give it my best shot.  While my husband was feeding her breakfast, I found a basket and decided to 'hunt' for things in my house to put in it - things that make noise, she could chew on, etc.  We still hadn't unpacked everything from the move, so I wasn't sure I could find enough (again...wrong).  Here's what I included:
-small wooden cutting board
-small metal whisk
-a milk storage bottle filled  halfway with rice
-a plastic bag clip
-teething ring
-a baby friendly mommy bracelet
-a small plastic toy milk carton
-a baby fork with a round handle
-a spoon
-a small crinkly toy
- a plastic frog toy
-a small ring toy with different textured leaves
-and last but not least, we had a stroller toy (that never really worked for Jaleyn, and always got in the way of the infant carseat handle).  I cut off the two hanging toys, and put those and the plush elephant part in the basket.

Some of these items were part of toys, or toys that I didn't really know what to do with, but found a new use in the basket.

I turned off the TV, and moved all of her other toys somewhere else, and gave her the basket, and I watched her (the site suggested only interacting with your baby when she/he invites you to).  I watched her pull out an object, play with it and set it to the side.  She would then pull out another object, and sometimes go back to the first ones - but she would always concentrate on each one and try to figure out it's use.  By the end of it, she had the whole basket dumped upside down, but she was totally enthralled with it all.


She would occasionally look up at my husband and I with glee (I would never leave her alone with the basket...not all items are completely baby safe) as she found a use for each item (chewing, banging, flipping around in her hand).  Not once did she get upset and cry out for our attention.  She was stimulated and she was learning.  I didn't even plan enough time for her to play with it - after a half hour it was time for lunch, and I packed it up and placed it out of sight in the kitchen until it is time for her to experience the treasures again.

I challenge you to try it with your own baby.  Change out the 'treasures' frequently.  I plan on having a couple separate 'treasure baskets' - ones that make noise, ones with textures, etc.  It didn't take a lot of time, and it cost absolutely nothing to do....but so much more rewarding than always plunking your baby down with her usual toys, with music or TV on in the background.

On a totally separate but not unrelated note, I now have a board on Pinterest labelled "Pins I've Actually Done" (as well as a new label on this blog), and I'm determined to implement at least one Pin a week that I have run across.  Stay tuned for the reviews :)